We all love to get away, whether it’s a weekend getaway, a longer trip further afield or a once-in-a-lifetime journey to a bucket-list location. We also love coming home with lots of pretty pictures to share with friends and family and of course to post online. As the Backroads photo editor, I’m here to offer you a few tips to help you come home from your next trip with even better, prettier pictures.
What’s the Best Camera for Me?

Before we begin, let me answer this most often asked question for you: the “best” camera is the one you have with you. Having a high-quality camera is NOT the same thing as taking a good photo.
If you’re an avid photographer, you already know you can’t beat the image quality of good camera equipment. But you really don’t need to haul around a heavy camera with lots of large lenses to take good photos. Cell phones have come a long way regarding the image quality they can produce. On my last trip through Italy, even though I had my professional camera, I found it easier and more spontaneous to use my cell phone in places like churches, museums or while having meals.
In the end, it’s the image that matters. When we review images for our annual Guest Photo Contest here at Backroads, we don’t look at the type of camera that was used to take the picture; a good image jumps off the screen regardless.
Photography Tip 1: Avoid the Middle

Most people will automatically bullseye the subject of their photo smack dab in the middle of the frame. Our brains are wired to see this as being simple and easy to comprehend. But conversely, we don’t really visually engage with the image. Our brains go, “Oh, that’s nice. Next.”
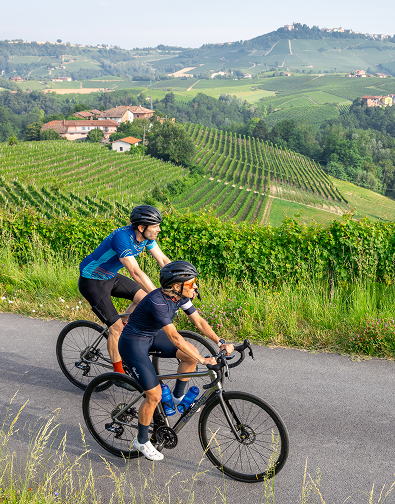
Putting people or subjects just slightly off-center instantly causes our brains to perk up just a bit more to try to make sense of what we’re seeing. If a person or animal is looking to the left, put them slightly to the right side of the frame so there’s a little more room in the direction they’re looking. The same applies to people or subjects moving through the frame. For instance, with a group of hikers on a path or cyclists on a road: if they’re moving to the left, put them more to the right.
Photography Tip 2: Tip the Camera Up or Down when Shooting Landscapes

Another common error is putting the horizon line right across the middle of the frame, especially when shooting landscapes. This tells the viewer that the sky and ground are equally important. But this is seldom true.
Instead, decide which part of the scene is more important. If there’s a lot of blank blue or grey sky, tip your camera down to fill the frame with more landscape and less sky. Conversely, if you’re shooting dramatic clouds over a mountain, tip your camera up and show more sky. Another example: when at the beach at sunset, tip the camera down to show less sky. This will keep that beautiful beach from becoming a dark, featureless void.
One exception is when shooting reflections. Occasionally putting the reflection line across the middle of the frame gives our brains a nice sense of visual balance, much like a Rorschach Psychological Ink Blot Test pattern.
Photography Tip 3: Shoot Smaller in “Bad” or Soft Light

Don’t despair on those gray, rainy days; you can still take good photos. While big, grand landscape scenes don’t work too well under “bad” soft light conditions, those same soft light conditions are great for shooting smaller scenes and details. In other words, look for the trees instead of the forest: try zooming in to show parts of the landscapes without any sky. This is also wonderful light for shooting close-ups of wildflowers, street scenes and candid portrait shots of your fellow traveling companions.
Photography Tip 4: Don’t Just Stand and Smile for the Camera

One of the most common vacation shots is the “stand over there and smile for the camera” pose. Although you get a nice image of friends or family in a specific setting, the pose is usually quite stiff and static. It’s a simple, we are here document.
Instead, encourage the people in the frame to interact with each other. Tell a joke to coax out a laugh, have them kiss (if appropriate), really celebrate or just mess around with each other a bit. Anything you can do to raise the energy level of the people to capture an authentic twinkle of life in their eyes and face will make the photo much more fun, personable and memorable.
Also, move a bit closer; you don’t always need to show someone from the feet up (unless you’re trying to show off their outfit). Consider shooting individuals, couples or groups of six or less from the waist up for a more personal, portrait-style image.
Photography Tip 5: MOVE! a.k.a. Perspective a.k.a. Use It or Lose It

Fun fact: The average person takes most of their photos with the camera approximately 5’4” (1.6m) off the ground. Try shooting pictures from a lower to ground-level perspective or hold the camera above your head to get a slightly higher perspective. The latter works especially well if you’re walking in tight places with groups of other people, like in village alleyways or on narrow paths.
Most folks also think wherever they first stop to take a picture is the best place to shoot from, but oftentimes, it isn’t. Consider if moving a few steps right or left will help the scene. In some cases, you can hide something you don’t want in the frame by putting it behind what you’re shooting, or you can move it out of the frame altogether.
In other cases, you can establish a stronger visual connection between subjects.
Think of the camera frame like a tic-tac-toe game box. The place where lines of the box intersect are called power points. Putting important subjects on opposing diagonal power points creates a more dynamic visual relationship. For example, if you’re taking a photo of someone standing right in front of a statue, mountain or building, try moving slightly to one side, or maybe even a little higher or lower so that instead of a straight horizontal or vertical line between the subjects, you now create a more visually appealing diagonal line between them.
A good metaphor I give my photography students: as far as your eyes and brain are visually concerned, “Escalators are better than elevators or sidewalks.”
BONUS TIP: Fill the Frame with What You Like

It’s really that simple: instead of just picking up and pointing the camera at something, think of the scene as a mathematical prime number problem. How much visual “stuff” can you remove or “factor out” of the frame so all you capture is whatever first caught your attention in any given scene. To paraphrase Goldilocks and the Three Bears, show “Not too much, not too little, but just right.”

Got a great photo from your 2025 Backroads trip? Don’t forget to enter our annual Guest Photo Contest. You could win up to $5,000 in trip credit or have your image used in a Backroads publication.
Find even more tips for taking great photos, see the 2024 contest winners and submit your photos here! Enter soon--the deadline for submission is December 31, 2025.